Ruins of Caerdoon
| The Ruins of Caerdoon | |
|---|---|
| Information | |
| Plane | Arcavios |
| Part of | Orrithia |
The Ruins of Caerdoon are the remains of an ancient fortress in Orrithia, on the plane of Arcavios. The site was the scene of a long-forgotten battle in which hundreds perished, leaving the ground steeped in lingering necromantic energy. This desolation, combined with the fort’s partially intact defenses, has made the ruins a dangerous place, long avoided by travelers except for rare archaeological surveys conducted by Lorehold College. More recently, the fortress was the site of a large-scale necromantic ritual that harnessed the death-saturated land in an attempt to achieve immortality.
Description
The fortress, though reduced mostly to rubble, retains enough of its original construction to be defensible. The top portions of its walls have been blasted away, leaving fragments ten feet high and two feet thick. Gnarled trees with discolored leaves cluster near the approaches, and all vegetation within a mile of the site appears withered. No artificial light sources remain; the ruins are lit only by the sun and moon. The ground itself is desecrated, bolstering undead that linger from the ancient battle. The air hangs heavy with the sense that the boundary between life and death is thin here.
Notable locations

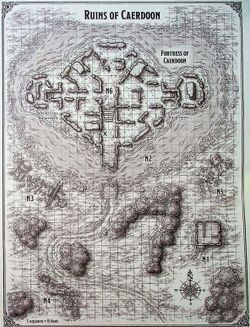
Locations on the map are marked with a letter and number
- Haunted Watchtower (N1) – The last surviving watchtower stands battered but intact near the southern road. It is haunted by the restless spirit of the garrison commander who once defended Caerdoon, whose mournful cry can be heard when intruders draw near.
- Wailing Moat (N2) – A moat of viscous, foul-smelling slime encircles much of the ruin. Beneath its surface lie the moss-covered bones of the fallen. The spirits of these soldiers cry out in eternal rage, and a dome of opaque necrotic energy has been known to rise from its depths, sealing the fortress from the outside.
- Wreckage (N3) – The splintered remains of siege engines—ballistas, catapults, and a trebuchet—lie in a jumbled heap, relics of the assault that brought down the fortress walls.
- Supply Train (N4) – Shattered wagons and broken crates lie along the trail leading to the fortress, all that remains of a military supply line destroyed in the siege.
- Siege Towers (N5) – Two colossal siege towers lie collapsed near the moat, charred and rusted from the battle’s final moments. The remains are half-buried under centuries of windblown debris.
- Fortress (N6) – The central stronghold of Caerdoon, its outer shell still partially intact. Within, strange glyphs and a pulsating necrotic construct once maintained a magical barrier around the site.
- Fortress Basement - Beneath the fortress lies a network of damp, torchlit chambers built from smooth, worked stone. Though many areas are collapsed or emptied of supplies, some contain military equipment, alchemical concoctions, and unstable munitions left over from Caerdoon’s defenders. A ruined elevator shaft descends into a rubble-filled passage that once connected to deeper tunnels. The largest chamber bears signs of a recent and highly dangerous ritual, marked by runes, floating stones, and the remains of a magical cocoon. This is where Murgaxor Grenshel was tracked down and defeated by a party of fourth-year Strixhaven students.[1]
References
- ↑ Wizards RPG Team (2021), "D&D Strixhaven: A Curriculum of Chaos", Wizards of the Coast.
